5.4 Volumes and Storage
Since Pods are ephemeral, any data associated is deleted when a Pod or container restarts. Applications are run stateless the majority of the times, meaning the data does not needs to be kept on the node and the data is stored on an external database. However, there are times when the data wants to be kept, shared between Pods, or when it should persist on the host file system (disk). As described in the section about Pods, a Pod can contain volumes. Volumes are exactly what is needed for such tasks. They are used to store and access data which can be persistent or long lived on K8s.
There are different types of volumes, e.g.:
- EmptyDir
- HostPath Volume
- awsElasticBlockStore: AWS EBS volumes are persistent and originally unmounted. They are read-write-once-only tough.
- There are multiple other types of volumes, a full list can be found here: https://kubernetes.io/docs/concepts/storage/volumes/#volume-types
5.4.1 EmptyDir Volume
An EmptyDir Volume is initially empty (as the name suggests). The volume is a temporary directory that shares the pods lifetime. If the pod dies, the contents of the emptyDir are lost as well. The EmptyDir is also used to share data between containers inside a Pod during runtime.
# volume_empty-dir.yaml
apiVersion: apps/v1
kind: Deployment
metadata:
  name: emptydir-volume
spec:
  selector:
    matchLabels:
      app: emptydir-volume
  template:
    metadata:
      labels:
        app: emptydir-volume
    spec:
      # add a volume to the deployment
      volumes:
        # mimics a caching memory type
        - name: cache
          # specify the volume type and the temp directory
          emptyDir: {}
        # of course there could also be a second volume added
      containers:
      - name: container-one
        image: busybox
        # image used for testing purposes
        # since the testing image immediately dies, we want to
        # execute an own sh command to interact with the volume
        volumeMounts:
          # The name must match the name of the volume
          - name: cache
            # interal reference of the pod
            mountPath: /foo
        command:
          - "/bin/sh"
        args:
          - "-c"
          - "touch /foo/bar.txt && sleep 3600"
        resources:
          limits:
            memory: "128Mi"
            cpu: "500m"
        # create a second container with a different internal mountPath
      - name: container-two
        image: busybox
        volumeMounts:
          - name: cache
            mountPath: /footwo
        command:
          - "sleep"
          - "3600"
        resources:
          limits:
            memory: "128Mi"
            cpu: "500m"
As stated in the yaml, the busybox image immediately dies. If the Containers where created without the shell commands, the pod would be in a crashloopbackoff-state. To prevent the Pod to do so it is caught with the sleepcommands until it scales down. Accessing a container using kubectl exec, it can be checked whether the foo/bar.txt has been created in container-one.
When checking the second container container-two, the same file should be visible as well. This is because both containers refer to the same volume. Keep in mind though that the mountPath of the container-two is different.
# get in container
kubectl exec -it <emptydir-volume-name> -c container-one -- sh
# check whether bar.txt is present
ls

# accessing the second container, there is also a file foo/bar.txt
# remember, both containers share the same volume
kubectl exec -it <emptydir-volume-name> -c container-two -- sh
ls
5.4.2 HostPath Volume
THe HostPath Volume type is used when an application needs to access the underlying host file system, meaning the file system of the node. HostPath represents a pre-existing file or directory on the host machine. However, this can be quite dangerous and should be used with caution. If having the right access, the application can interfere and basically mess up the host. It is therefore recommended to set the rights to read only to prevent this from happening.
# volume_hostpath.yaml
apiVersion: apps/v1
kind: Deployment
metadata:
  name: hostpath-volume
spec:
  selector:
    matchLabels:
      app: hostpath-volume
  template:
    metadata:
      labels:
        app: hostpath-volume
    spec:
      volumes:
        - name: var-log
          # specify the HostPath volume type
          hostPath:
            path: /var/log
      containers:
      - name: container-one
        image: busybox
        volumeMounts:
          - mountPath: /var/log
            name: var-log
            readOnly: true
        command:
          - "sleep"
          - "3600"
        resources:
          limits:
            memory: "128Mi"
            cpu: "500m"
Similar to the EmptyDir Volume example, you can check the implementation of the HostPath Volume by accessing the volume. When comparing the file structures of the hostpath-volume deployment and the directory path: /var/log on the node the deployment is running, they should be the same. All the changes made to either on of them will make the changes available on the other. By making changes via the pod we can directly influence the Node. Again, this is why it is important to keep it read-only.
# access the
kubectl exec -it <hostpath-volume-name> -- sh

# ssh into node
minikube ssh <node>
5.4.3 Persistent Volumes
Persistent Volumes allow to store data beyond a Pods lifecycle. If a Pod fails, dies or moves to a different node, the data is still intact and can be shared between pods. Persistent Volume types are implemented as plugins that K8s can support(a full list can be found online). Different types of Persistent Volumes are:
- NFS
- Local
- Cloud Network storage (AWS EBS, Azure File Storage, Google Persistent Disk)
The following example show how the usage of Persistent Volumes works on the AWS cloud. K8s is running on an AWS EKS Cluster and AWS EBS Volumes attached to it. The Container storage interface (CSI) of K8s to use Persistent Volumes is implemented by the EBS provider, e.g. the aws-ebs-plugin. This enables a the use of Persistent Volumes in the EKS cluster. Therefore, a Persistent Volume (PV) is rather the mapping between the storage provider (EBS) and the K8s cluster, than a volume itself. The storage class of a Persistent Volume can be configured to the specific needs. Should the storage be fast or slow, or do we want to have each as a storage? Or might there be other parameters to configure the storage?
If a Pods or Deployments want to consume storage of the PV, they need to get access to the PV. This is done via a so called persistent volume claim (PVC).
All of this is part of a Persistent Volume Subsystem. The Persistent Volume Subsystem provides an API for users and administrators. The API abstracts details of how storage is provided from how it is consumed. Again, the provisioning of storage is done via a PV and the consumption via a PCV.
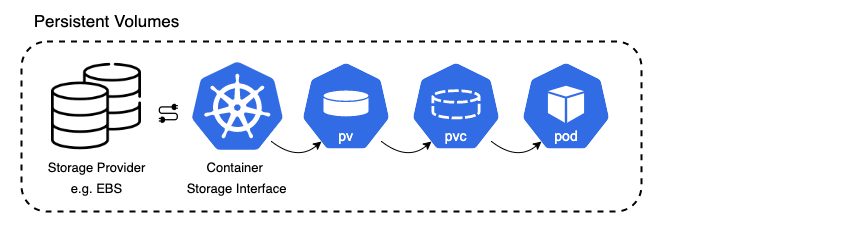
Persistent Volume Subsystem
Listed below are again the three main components when dealing with Persistent Volumes in K8s
- Persistent Volume: is a storage resource provisioned by an administrator
- PVC: is a user’s request for and claim to a persistent volume.
- Storage Class: describes the parameters for a class of storage for which PersistentVolumes can be dynamically provisioned.
So how are Persistent Volumes specified in our deployments yamls? As there are kind:Pod ressources, there can similarly kind:PersistentVolume and kind:PersistentVolumeClaim be specified. At first, a PV is created. As we run on minikube and not on the cloud, a local storage in the node is allocated. Second, a PVC is created requesting a certain amount of that storage. This PVC is then linked in the specifications of a Deployment to allow its containers to utilized the storage.
Before applying the yaml-files we need to allocate the local storage by claiming storage on the node and set the paths specified in the yamls. To do this, we ssh into the node using minikube ssh. We can then create a specific path on the node such as /mnt/data/. We might also create a file in it to test accessing it when creating a PVC to a Pod. Since we do not know yet on what node the Pod is scheduled, we should create the directory on both nodes. Below are all steps listed again.
# ssh into node
minikube ssh
# create path
sudo mkdir /mnt/data
# create a file with text
sudo sh -c "echo 'this is a pvc test' > /mnt/data/index.html"
# do this on both nodes as pod can land on either one of them
Afterward we can apply the yaml files and create a PV, PVC, and the corresponding Deployment utilizing the PVC. The yaml code below shows this process.
# volume_persistent-volume.yaml
apiVersion: v1
kind: PersistentVolume
metadata:
  name: mypv
spec:
  # specifiy the capacity of the PersistentVolume
  capacity:
    storage: "100Mi"
  volumeMode: Filesystem
  accessModes:
    - ReadWriteOnce
  persistentVolumeReclaimPolicy: Recycle
  storageClassName: manual
  hostPath:
    path: "/mnt/data"
    # specify the hostPath on the node
    # that's the path we specified on our node
---
apiVersion: v1
kind: PersistentVolumeClaim
metadata:
  name: mypvc
spec:
  resources:
    requests:
      # we request the same as the PV is specified
      # so we basically request everything
      storage: "100Mi"
  volumeMode: Filesystem
  storageClassName: "manual"
  accessModes:
    - ReadWriteOnce
---
apiVersion: apps/v1
kind: Deployment
metadata:
  name: pv-pvc-deployment
spec:
  selector:
    matchLabels:
      app: pv-pvc
  template:
    metadata:
      labels:
        app: pv-pvc
    spec:
      volumes:
        - name: data
          # define the use of the PVC by specifying the name
          # specify the pod/deployment can use the PVC
          persistentVolumeClaim:
            claimName: mypvc
      containers:
      - name: pv-pvc
        image: nginx:latest
        volumeMounts:
          - mountPath: "/usr/share/nginx/html"
            # since the PVC is stated, the container needs to
            # mount inside it
            # name is equal to the pvc name specified
            name: data
        resources:
          limits:
            memory: "128Mi"
            cpu: "500m"
        ports:
          - containerPort: 80
---
apiVersion: v1
kind: Service
metadata:
  name: pv-pvc
spec:
  type: LoadBalancer
  selector:
    app: pv-pvc
  ports:
  - port: 80
    targetPort: 80
By accessing a pod using kubectl exec -it <persistent-volume-name> -- sh we can check whether the path is linked using the PVC. Now, the end result may seem the same as what we did with the HostPath Volume. But it actually is not, it just looks like it since both, the PersistentVolume and the HostPath connect to the Host. Yet, the locally mounted path would be somewhere else when running in the cloud. The PV configuration would point to another storage source instead of a local file system, for example an attached EBS of EFS storage. Since we also created a LoadBalancer service, we can run minikube tunnel to expose the application deplyment under localhost:80. It should show the input of the index.html file we created on the storage.