4.1 Core Components
The four primary components of MLflow are shown in more detail and with exemplary code in the following sections.
4.1.1 MLflow Tracking
MLflow Tracking allows to log and compare parameters, code versions, metrics, and artifacts of a machine learning model. This can be easily done by minimal changes to your code using the MLflow Tracking API. The following examples depict the basic concepts and show how to use it. To use MLflow within your code it needs to be imported first.
import mlflow4.1.1.1 MLflow experiment
MLflow experiments are a part of MLflow’s tracking component that allow to group runs together based on custom criteria. For example multiple model runs with different model architectures might be grouped within one experiment to make it easier for evaluation.
experiment_name = "introduction-experiment"
mlflow.set_experiment(experiment_name)
4.1.1.2 MLflow run
An MLflow run is an execution environment for a piece of machine learning code. Whenever parameters or performances of a ML run or experiment should be tracked, a new MLflow run is created. This is easily done using MLflow.start_run(). Using MLflow.end_run() the run will similarly be ended.
run_name = "example-run"

mlflow.start_run()
run = mlflow.active_run()
print(f"Active run_id: {run.info.run_id}")
mlflow.end_run()
It is a good practice to pass a run name to the MLflow run to identify it easily afterwards. It is also possible to use the context manager as shown below, which allows for a smoother style.
run_name = "context-manager-run"

with mlflow.start_run(run_name=run_name) as run:
    run_id = run.info.run_id
    print(f"Active run_id: {run_id}")
Child runs It is possible to create child runs of the current run, based on the run ID. This can be used for example to gain a better overview of multiple run. Belows code shows how to create a child run.
# Create child runs based on the run ID
with mlflow.start_run(run_id=run_id) as parent_run:
    print("parent run_id: {}".format(parent_run.info.run_id))
    with mlflow.start_run(nested=True, run_name="test_dataset_abc.csv") as child_run:
        mlflow.log_metric("acc", 0.91)
        print("child run_id : {}".format(child_run.info.run_id))

with mlflow.start_run(run_id=run_id) as parent_run:
    print("parent run_id: {}".format(parent_run.info.run_id))
    with mlflow.start_run(nested=True, run_name="test_dataset_xyz.csv") as child_run:
        mlflow.log_metric("acc", 0.90)
        print("child run_id : {}".format(child_run.info.run_id))
4.1.1.3 Logging metrics & parameters
The main reason to use MLflow Tracking is to log and store parameters and metrics during a MLflow run. Parameters represent the input parameters used for training, e.g. the initial learning rate. Metrics are used to track the progress of the model training and are usually updated over the course of a model run. MLflow allows to keep track of the model’s train and validation losses and to visualize their development across the training run. Parameters and metrics can be easily logged by calling MLflow.log_param and MLflow.log_metric. One can also specify a tag to identify the run by using MLflow.set_tag. Belows example show how to use each method within a run.
run_name = "tracking-example-run"
experiment_name = "tracking-experiment"
mlflow.set_experiment(experiment_name)

with mlflow.start_run(run_name=run_name) as run:

    # Parameters
    mlflow.log_param("learning_rate", 0.01)
    mlflow.log_params({"epochs": 0.05, "final_activation": "sigmoid"})

    # Tags
    mlflow.set_tag("env", "dev")
    mlflow.set_tags({"some_tag": False, "project": "xyz"})

    # Metrics
    mlflow.log_metric("loss", 0.001)
    mlflow.log_metrics({"acc": 0.92, "auc": 0.90})

    # It is possible to log a metrics series (for example a training history)
    for val_loss in [0.1, 0.01, 0.001, 0.00001]:
        mlflow.log_metric("val_loss", val_loss)

    for val_acc in [0.6, 0.6, 0.8, 0.9]:
        mlflow.log_metric("val_acc", val_acc)

    run_id = run.info.run_id
    experiment_id = run.info.experiment_id
    print(f"run_id: {run_id}")
    print(f"experiment_id: {experiment_id}")
It is also possible to add information after the experiment ran. One just needs to specify the run ID from the previous run to the current run.
The example below shows how to do this, and uses the mlflow.client.MLflowClient. The mlflow.client module provides a Python CRUD interface, which is a lower level API directly translating to the MLflow REST API calls. It can be used similarly to the mlflow-module of the higher level API. It is mentioned here to give a hint of its existence.
from mlflow.tracking import MLflowClient

# add a note to the experiment
MLflowClient().set_experiment_tag(
    experiment_id, "MLflow.note.content", "my experiment note")
# add a note to the run
MLflowClient().set_tag(run_id, "MLflow.note.content", "my run note")

# Or we can even log further metrics by calling MLflow.start_run on a specific ID
with mlflow.start_run(run_id=run_id):
    run = mlflow.active_run()
    mlflow.log_metric("f1", 0.9)
    print(f"run_id: {run.info.run_id}")
4.1.1.4 Display & View metrics
How can the logged parameters and metrics be used and viewed afterwards? It is possible to give an overview of the currently stored runs using the MLflow API and printing the results.
current_experiment = dict(mlflow.get_experiment_by_name(experiment_name))
mlflow_run = mlflow.search_runs([current_experiment['experiment_id']])
print(f"MLflow_run: {mlflow_run}")
MLflow Model Tracking CLI Run Overview
Yet, viewing all the results in the web interface of MLflow gives a much better overview. By default, the tracking API writes the data to the local filesystem of the machine it’s running on under a ./mlruns directory. This directory can be accessed by the MLflow’s Tracking web interface by running MLflow ui via the command line. The web interface can be viewed in the browser under http://localhost:5000 (The port: 5000 is the MLflow default). The metrics dashboard of a run looks like the following:
MLflow Model Tracking Dashboard
It is also possible to configure MLflow to log to a remote tracking server. This allows to manage results on in a central place and share them across a team. To get access to a remote tracking server it is needed to set a MLflow tracking URI. This can be done multiple way. Either by setting an environment variable MLflow_TRACKING_URI to the servers URI, or by adding it to the start of our code.
import mlflow
mlflow.set_tracking_uri("http://YOUR-SERVER:YOUR-PORT")
mlflow.set_experiment("my-experiment")
4.1.1.5 Logging artifacts
Artifacts represent any kind of file to save during training, such as plots and model weights. It is possible to log such files as well, and place them within the same run as parameters and metrics. This means everything created within a ML run is saved at one point. Artifact files can be either single local files, or even full directories. The following example creates a local file and logs it to a model run.
import os

mlflow.set_tracking_uri("http://127.0.0.1:5000/")

# Create an example file output/test.txt
file_path = "outputs/test.txt"
if not os.path.exists("outputs"):
    os.makedirs("outputs")
with open(file_path, "w") as f:
    f.write("hello world!")

# Start the run based on the run ID and log the artifact
# we just created
with mlflow.start_run(run_id=run_id) as run:
    mlflow.log_artifact(
        local_path=file_path,
        # store the artifact directly in run's root
        artifact_path=None
    )
    mlflow.log_artifact(
        local_path=file_path,
        # store the artifact in a specific directory
        artifact_path="data/subfolder"
    )

    # get and print the URI where the artifacts have been logged to
    artifact_uri = mlflow.get_artifact_uri()
    print(f"run_id: {run.info.run_id}")
    print(f"Artifact uri: {artifact_uri}")
4.1.1.6 Autolog
Previously, all the parameters, metrics, and files have been logged manually by the user. The autolog-feature of MLflow allows for automatic logging of metrics, parameters, and models without the need for an explicit log statements. This feature needs to be activated previous to the execution of a run by calling MLflow.sklearn.autolog().
import mlflow.sklearn
import numpy as np
from sklearn.ensemble import RandomForestRegressor

params = {"n_estimators": 4, "random_state": 42}

mlflow.sklearn.autolog()

run_name = 'autologging model example'
with mlflow.start_run(run_name=run_name) as run:
    rfr = RandomForestRegressor(
        **params).fit(np.array([[0, 1, 0], [0, 1, 0], [0, 1, 0]]), [1, 1, 1])
    print(f"run_id: {run.info.run_id}")

mlflow.sklearn.autolog(disable=True)
Even though this is a very convenient feature, it is a good practice to log metrics manually, as this gives more control over a ML run.
4.1.2 MLflow Models
MLflow Models manages and deploys models from various different ML libraries such as scikit-learn, TensorFlow, PyTorch, Spark, and many more. It includes a generic MLmodel format that acts as a standard format to package ML models so they can be used in different projects and environments. The MLmodel format defines a convention that saves the model in so called “flavors”. For example mlflow.sklearn allows to load mlflow models back into scikit-learn.
The stored model can also be served easily and conveniently using these flavors as a python function either locally, in Docker-based REST servers containers, or on commercial serving platforms like AWS SageMaker or AzureML. The following example is based on the scikit-learn library.
# Import the sklearn models from MLflow
import mlflow.sklearn
from sklearn.ensemble import RandomForestRegressor

mlflow.set_tracking_uri("http://127.0.0.1:5000/")

run_name = "models-example-run"
params = {"n_estimators": 4, "random_state": 42}

# Start an MLflow run, train the RandomForestRegressor example model, and
# log its parameeters. In the end the model itself is logged and stored in MLflow
run_name = 'Model example'
with mlflow.start_run(run_name=run_name) as run:
    rfr = RandomForestRegressor(**params).fit([[0, 1, 0]], [1])
    mlflow.log_params(params)
    mlflow.sklearn.log_model(rfr, artifact_path="sklearn-model")

model_uri = "runs:/{}/sklearn-model".format(run.info.run_id)
model_name = f"RandomForestRegressionModel"

print(f"model_uri: {model_uri}")
print(f"model_name: {model_name}")
Once a model is stored in the correct format it can be identified by its model_uri, loaded, and used for prediction.
import mlflow.pyfunc

# Load the model and use it for predictions
model = mlflow.pyfunc.load_model(model_uri=model_uri)
data = [[0, 1, 0]]
model_pred = model.predict(data)
print(f"model_pred: {model_pred}")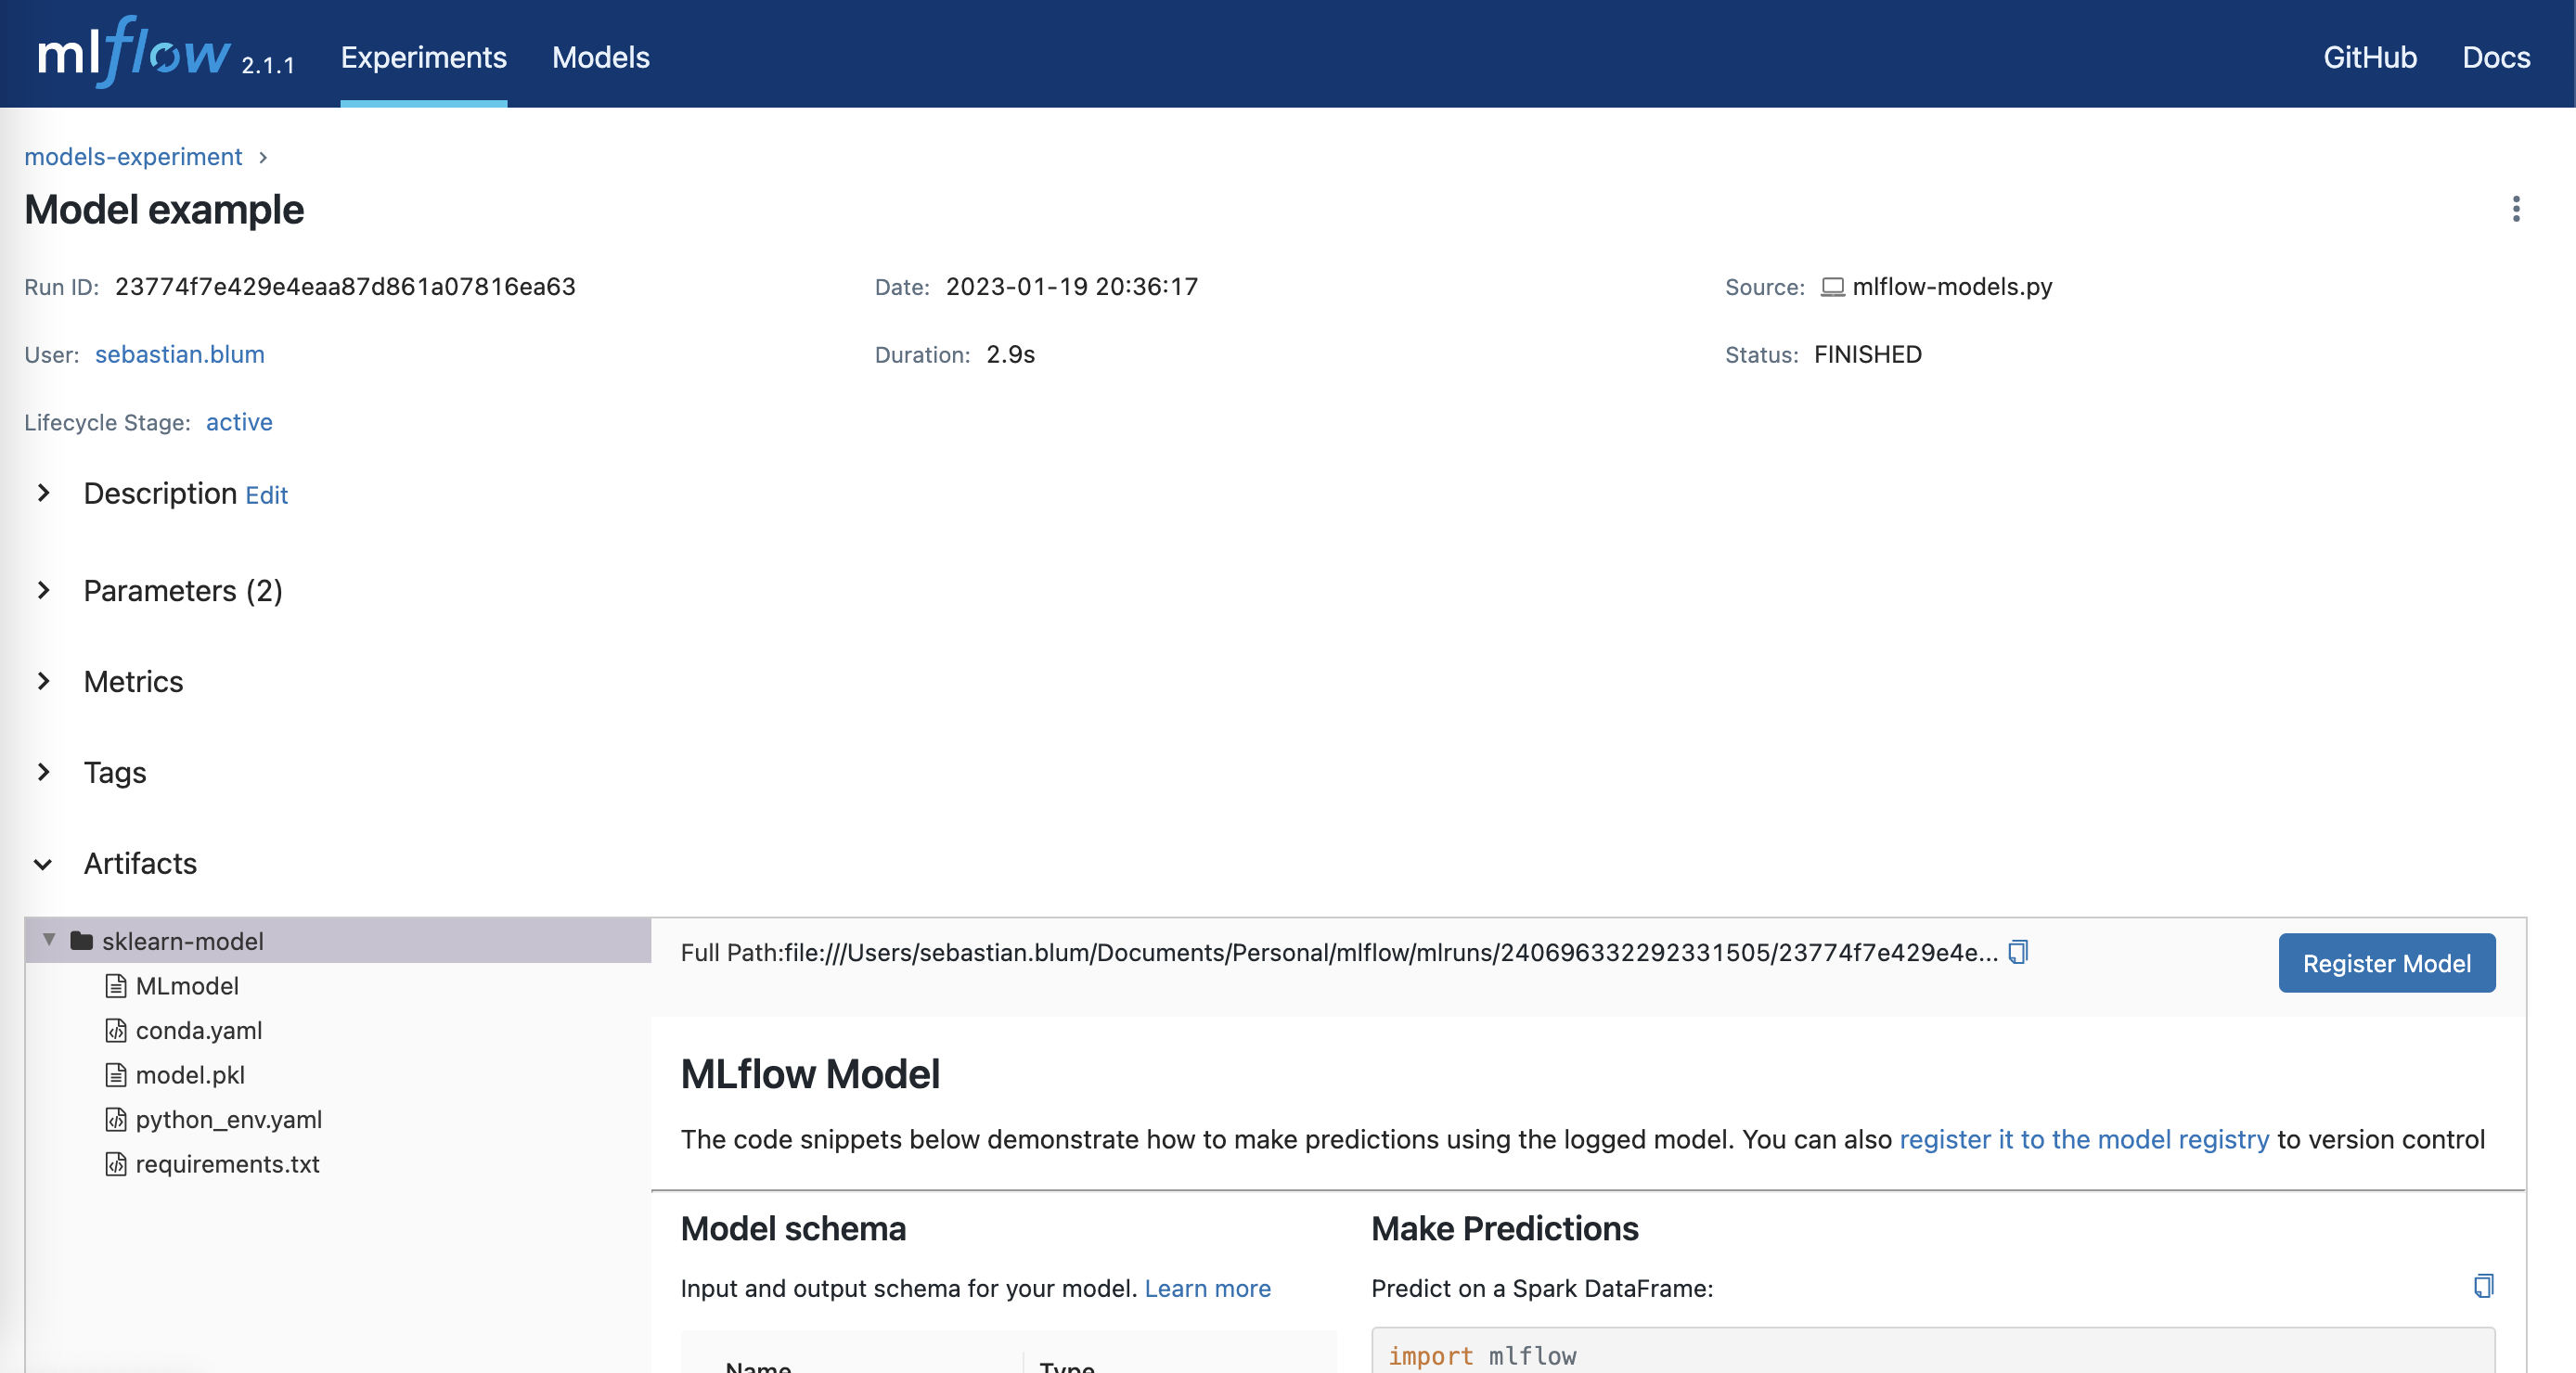
MLflow Models
4.1.3 MLflow Model Registry
The MLflow Model Registry provides a central model store to manage the lifecycle of an ML Model. This allows to register MLflow models like the RandomForestRegressor from the previous section to the Model Registry and include model versioning, stage transitions, and annotations. In fact, by running MLflow.sklearn.log_model we already did exactly that. Look at how easy the MLflow API is to use. Let’s have a look at the code again.
import mlflow.sklearn
import mlflow.pyfunc
from sklearn.ensemble import RandomForestRegressor

mlflow.set_tracking_uri("http://127.0.0.1:5000/")

run_name = "registry-example-run"
params = {"n_estimators": 4,
          "random_state": 42}

run_name = 'model registry example'
with mlflow.start_run(run_name=run_name) as run:
    rfr = RandomForestRegressor(**params).fit([[0, 1, 0]], [1])
    mlflow.log_params(params)
    # Log and store the model and the MLflow Model Registry
    mlflow.sklearn.log_model(rfr, artifact_path="sklearn-model")

model_uri = f"runs:/{run.info.run_id}/sklearn-model"
model_name = f"RandomForestRegressionModel"

model = mlflow.pyfunc.load_model(model_uri=model_uri)
data = [[0, 1, 0]]
model_pred = model.predict(data)
print(f"model_pred: {model_pred}")
Yet, it is also possible to register the MLflow model in the model registry by calling MLflow.register_model such as show in belows example.
# The previously stated Model URI and name are needed to register a MLflow Model
mv = mlflow.register_model(model_uri, model_name)
print("Name: {}".format(mv.name))
print("Version: {}".format(mv.version))
print("Stage: {}".format(mv.current_stage))
Once registered to the model registry the model is versioned. This enables to load a model based on a specific version and to change a model version respectively. A registered model can be also modified to transition to another version or stage. Both use cases are shown in the example below.
import mlflow.pyfunc

# Load model for prediction. Keep note that we now specified the model version.
model = mlflow.pyfunc.load_model(
    model_uri=f"models:/{model_name}/{mv.version}"
)

# Predict based on the loaded model
data = [[0, 1, 0]]
model_pred = model.predict(data)
print(f"model_pred: {model_pred}")
Let’s stage a model to 'Staging'. The for-loop below prints all registered models and shows that there is indeed a model with a 'Staging'-stage.
# Transition the model to another stage
from mlflow.client import MLflowClient

client = MlflowClient()

stage = 'Staging'  # None, Production

client.transition_model_version_stage(
    name=model_name,
    version=mv.version,
    stage=stage
)

# print registered models
for rm in client.search_registered_models():
    pprint(dict(rm), indent=4)
4.1.4 MLflow Projects
MLflow Projects allows to package code and its dependencies as a project that can be run reproducible on other data. Each project includes a MLproject file written in the YAML syntax that defines the projects dependencies, and the commands and arguments it takes to run the project. It basically is a convention to organizes and describe the model code so other data scientists or automated tools can run it conveniently. MLflow currently supports four environments to run your code: Virtualenv, Conda, Docker Container, and system environment. A very basic MLproject file is shown below that is run in an Virtualenv
name: mlprojects_tutorial

# Use Virtualenv: alternatively conda_env, docker_env.image
python_env: <MLFLOW_PROJECT_DIRECTORY>/python_env.yaml

entry_points:
  main:
    parameters:
      alpha: {type: float, default: 0.5}
      l1_ratio: {type: float, default: 0.1}
    command: "python wine_model.py {alpha} {l1_ratio}"
A project is run using the MLflow run command in the command line. It can run a project from either a local directory or a GitHub URI. The MLproject file shows that two parameters are passed to the MLflow run command. This is optional in this case as they have default values. It is also possible to specify extra parameters such as the experiment name or to specify the tracking uri (check the official documentation for more). Below is a possible CLI command show to run the MLflow Project. By setting the MLFLOW_TRACKING_URI environment variable it is possible to also specify an execution backend for the run.
# Run the MLflow project from the current directory
# The parameters are optional in this case as the MLproject file has defaults
mlflow run . -P alpha=5.0

# It is also possible to specify an experiment name or to specify the
# Tracking_URI, e.g.
MLFLOW_TRACKING_URI=http://localhost:<PORT> mlflow run . --experiment-name="models-experiment"

# Run the MLflow project from a Github URI and use the localhost as backend
MLFLOW_TRACKING_URI=http://localhost:<PORT> MLflow run https://github.com/mlflow/mlflow-example/MLprojects --version=chapter/mlflow
The MLflow Projects API allows to chain projects together into workflows and also supports launching multiple runs in parallel. Combining this with for example the MLflow Tracking API enables an easy way of hyperparameter tuning to develop a model with a good fit.